
High Speed Digital Video Cameras
Updated 14th July 2020
My workhorse planetary digital video cameras were, for several years, DMK monochrome cameras from The Imaging Source, TIS. These were based on the highly-sensitive 640×480 pixel Sony ICX618 CCD chip. Most of the very early images on this site were taken with these DMK cameras. Times move on though and I sold the last of my DMK cameras in Spring of 2015 to help fund a move to ZWO, CMOS-based, digital video cameras. These are the cameras I now use for my planetary images.
I have found ZWO cameras to be great planetary imaging cameras due to their ease of use, lower noise, higher speed, larger chip sizes and also their ability to select reduced areas of the chip to image with (so-called ROI operation). The customer and technical support for ZWO cameras is also much superior to that from TIS. ZWO is run by Sam Wen, an amateur astronomer who really understands the needs of his customers. ZWO is highly innovative, continually striving to improve their products, and adding new cameras and accessories all the time. These cameras, operated under Firecapture image capture software, are a joy to use.
I currently own six ZWO cameras, all but the first of which support USB3.0 high speed operation. All have CMOS imaging chips;
- ASI120MM basic USB2.0 mono camera with 3.75um pixels
- ASI224MC low noise and IR sensitive OSC camera with 3.75um pixels
- ASI290MM mono low noise and IR sensitive with 2.9um pixels
- ASI174MM high speed and large chip size mono camera with 5.86um pixels
- ASI174MC one-shot colour (OSC) version of ASI174MM
- ASI462MC highly IR-sensitive, very low noise, colour camera with 2.9um pixels

ZWO ASI120MM (mono) and ZWO ASI224MC (colour)
I have two ZWO cameras with 3.75um pixels, the ASI120MM and the ASI224MC. The 3.75um square pixel size is quite a bit smaller than the 5.6um of the DMK cameras I was using previously and increases the image scale over these earlier cameras by ~50%.
The camera I now use the least is my ASI120MM. This a basic 1.2M pixel monochrome digital video camera with a 1280 x 960 CMOS chip. For one-shot colour (OSC) imaging at the same image scale I use my ASI224MC which has a slightly larger chip at 1304 x 976 pixels. OSC operation is achieved by the camera having a bayer colour filter matrix over the front of the CMOS chip. The ASI224MC is a very low read noise USB3.0 camera, capable of significantly higher speeds than the USB2.0 mono camera.
Both camera, ASI120MM and ASI224MC, have a clear, IR transmitting, protection filter in front of the chip to keep dust off the sensor. This is normal for a mono camera like the 120MM, where you might want to also use IR and UV filters, but not so for an OSC camera like the ASI224MC. OSC colour cameras normally have an IR/UV filter rather than a clear glass because their sensitivity in the IR is poor. The ASI224MC, however, can actually image into the near IR with 30% transmission at 900nm and in fact behaving essentially as a monochrome IR camera in the range 825nm – 1000nm.
These ZWO cameras are superb performers, great value for money and with Firecapture used to drive them, are incredibly versatile. They have the following advantages over my earlier CCD based cameras;
- Larger chip size allowing easier homing-in on subjects and larger frame sizes for large objects (moon). It also allows me to increase the image scale to make planets larger than 480 pixels across
- Easy to set a reduced frame size (ROI) and get benefits of increased data transfer rates (fps) as well as reduced file size
- Much faster frame transfer rates when not limited by the exposure duration
- Significantly lower read noise levels especially for the ASI224MC
- Higher sensitivity in the Green and Blue for ASI120MM
- High sensitivity in IR for the ASI224MC (see above)
Both cameras are fitted with very short C-mount to 1.25″ adaptors which screw into the T-thread to C-mount adaptor on the front of each camera. A second clear glass Astronomik (MC-Clear) filter is screwed into the front of this as further protection from the ingress of dust. Set up like this the two cameras are effectively parfocal so that I can use the colour camera to set up my ADC and then use the same prism settings and focus for the monochrome camera. This setting step using a colour camera is described on my ADC page
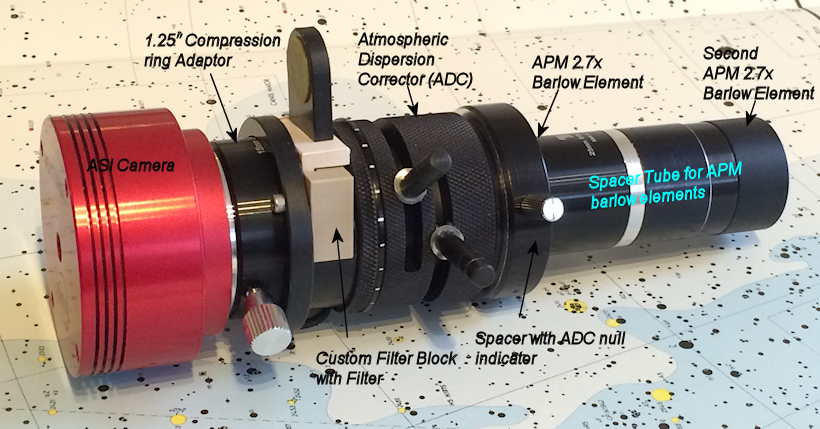
For most of my imaging the cameras mate with a customised filter and barlow imaging chain with 6.25x or 2.7x magnification as shown below which includes (from top to bottom on LH image);
- Telescope Service 15mm thick T2 to 1.25″ adaptor with compression ring to hold 1.25″ camera nosepiece
- Custom modified filter-block to take 1.25″ filters on custom holders allowing quick and easy filter changing. Even if not using filters, however, the block is always kept in the imaging chain for simplicity.
-For the mono cameras I use Astronomik Type IIC RGB filters for colour imaging. I can also use an L filter, various IR filters or a Baader Venus (UV) filter in here for more specialised imaging
-Although filters are traditionally not used for OSC cameras I do use an L filter for my colour ASI224MC when colour imaging as it has no built in UV/IR filter. I also can use IR filters in the block when making the most of this cameras very good IR sensitivity, for example imaging in methane light at 890nm. - Atmospheric Dispersion Corrector (ADC). See my ADC page for more details. This is left in place again for simplicity and to keep everything parfocal even if the levers are set parallel to nullify its effect.
- Single or doubled APM 2.7x coma correcting barlow elements as desired, giving 2.7x or 6.25x magnification. For best coma correcting performance the distances to the focal plane and the separation need to be at a specific distances. A custom spacer tube is available from Rupert at Astrograph if you want to use the two-up APM barlow combination to give 6.25x magnification. See the table in the section below for the different image scales I can get with my two Newtonian imaging scopes with the two different barlow configurations.
Other configurations are possible retaining the 1.25″ adaptor, filter block and ADC section as one piece, and attaching other barlows at the front end after unscrewing the T2 threaded end of the 2.7x/6.25x section. I can attach a 5x or 2.5x TV Powermate body or a 3x TV barlow as required.


Mono versus One-Shot Colour Imaging
These days, for colour planetary imaging, I find I use the one-shot colour (OSC) camera in preference to the mono camera. Traditionally planetary imagers turned their noses up at one-shot colour cameras as their performance was often much inferior when compared to using a monochrome imaging with RGB filters. These days, however, the quality of the colour bayer matrix has improved to the point that when used with an ADC the colour camera’s performance approaches that of the mono camera. The mono camera always has the potential to produce the highest resolution images, but the colour camera is much easier to use and in variable seeing, where the optimum focus changes all the time, is more likely to yield successful high quality final images. When you have a good colour video all three colours are ‘in the bag’ whereas for mono you have to hope the other two colour channels are good too- which often they aren’t. In addition, the colour camera is more productive. 10 colour videos produces 10 reds, 10 greens and 10 blues, whereas to capture this many of each colour with the mono camera would require 30 videos in total to be recorded.
Although the processing is much easier and quicker with the colour camera, each image is generally slightly noisier, due to the lower light throughput and higher shot noise that results. More images consequently need to be stacked to reduce noise. Usually this is a matter of needing to stack 3 images rather than 2 images- however, as you gather 3x as many with OSC imaging versus mono imaging anyway, this is not an issue.
With a colour camera it is important to keep the image scale up to ensure you have sufficient sampling of the image- although Autostakkert debayering claims to overcome this issue when it is used for debayering by using a drizzle method. My recommendation is to use the following rule of thumb for setting the image scale to obey the Nyquist rules and not lose resolution due to excessive pixel size choice;
-mono camera use a focal ratio of 3-5x the pixel size in microns (higher focal ratios for better seeing conditions)
-OSC camera use a focal ration of 5-7x the pixel size in microns
To get the best performance, the colour camera needs to be used with an ADC if you want to get images approaching those of the mono camera (more on this on my ADC page). According to Chris Garry, author of Pipp (Planetary Imaging PreProcessing Program), if you want to use some of these more modern debayer algorithms (not nearest neighbour) then it is essential that the three colour channels are aligned by use of an ADC beforehand.
ASI290MM
The ASi290MM is regarded as one the finest planetary imaging cameras ZWO have made to date, due to its low read noise, high IR sensitivity, high speed and it’s high pixel count of 2.1MP.
The camera was bought with the specific aim of using it for IR imaging of Uranus and Neptune– difficult targets due to their dimness and the fact that you require IR imaging to stand the best chance of seeing detail. To image these targets I was previously using my one-shot colour camera, the ASI224MC, with a Baader 610nm longpass IR filter, exploiting its tremendous IR sensitivity for all three colours (yes blue and green let through IR light on this camera). I used the camera at very high gain (1000x= a setting of 600 in Firecature) allowing me to use as short an exposure as possible, minimising atmospheric smearing effects but making up for the very high noise in individual frames by gathering many more frames. This technique makes the most of the principle that when considering the noise in the total final stack, it is the total accumulated time in the stack that matters not the noise in the individual frames. You can increase the gain and reduce the exposure and the increased noise in each frame is exactly compensated for by the commensurate increase in the number of frames due to the shorter exposure time.
With the ASI290MM I use the same high gain method for imaging the Ice Giants as I used with the ASI224MC but the camera, being monochrome, is even more sensitive in the IR reducing noise in the final image.
ASI174MM (mono) and ASI174MC (colour)
The ASI1174MM/ASI174MC cameras are a pair of 2.3M pixel monochrome/colour USB3.0 cameras which use the 5.86um pixel Sony IMX174 chip, with an amazing quantum efficiency of 80% at some wavelengths.
With their larger chips, these cameras were originally aimed at the solar and lunar imagers. It turns out, however, that they are also excellent planetary imaging cameras when used with a reduced chip area (so-called ROI [Region Of Interest] mode) to increase frame rate and reduce file size. They seem to be completely free of the ‘fixed pattern noise’ issue, where you sometime get a vertically banded pattern of noise at high gain and high camera temperature for the ASI120MM. Another advantage of the 174 chip is that it has a global shutter rather than a rolling shutter which will be very useful for my attempts at ISS imaging (rolling shutter causes distortions to the shape of the ISS). ZWO have produced a nice information sheet on these cameras which you can see by clicking the button below.
The ASI174 cameras are supplied by ZWO with front 2″ nosepieces which are 5mm longer than the ASI120/290/224 nosepieces and have a different arrangement for the protection window, which make it easier to remove to clean the chip. In order to have all parfocal cameras I have removed the longer nosepieces on the two ASI174 cameras and replaced them with low-profile nosepieces, where the front of the camera is 12.5mm from the chip (CS-mount distance) rather than 17.5mm (C-mount). This modification means that I can swap freely between any of the four ZWO cameras without the need to refocus or change ADC settings. The low-profile nosepieces do not have a protection window but I have short 1.25″ adaptors with appropriate 1.25″ protection filters on the ends to keep the dust out.
Another advantage of the low-profile nosepiece is the ability to use the cameras with my CS-mount fisheye lenses to use them as large area all-sky cameras (which you can read more about here).
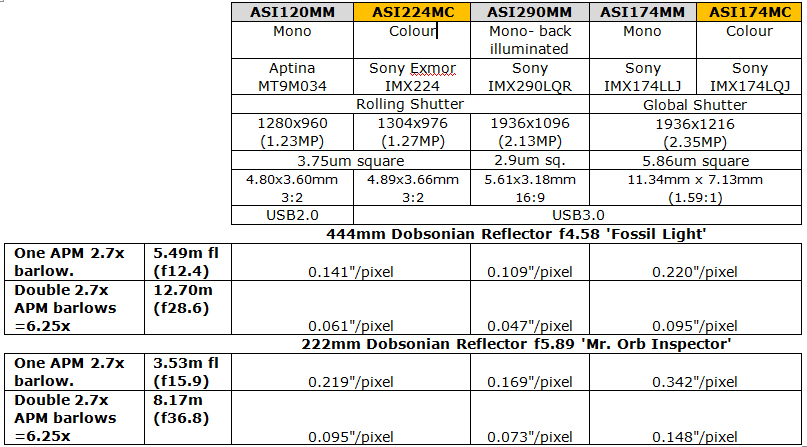
Image Scale and Camera Parameters
With the possibility of 2.7x and 6.25x magnifications and several different pixel sizes I have the capability of multiple image scales. This gives good flexibility to select my image scale appropriately for the object I am imaging- allowing optimisation of image resolution, noise, atmospheric smearing etc.
Key camera details including image scale are shown in the table below:
Focusing Eyepiece
A useful addition to my imaging kit, helping me to improve set-up time, has been a SWP wide field 20mm BC&F eyepiece which I have found is parfocal with my cameras. This eyepiece has a much wider field of view than my cameras, helping me easily home in on my object prior to imaging and get the focus right. I know that when I remove the eyepiece and insert one of my cameras that the focus will be the same. This is true whether I am using the 2.7x the 6.25x combination or any other barlow on the end of the AD. The parfocal eyepiece can also be useful to help crudely set my ADC. I have added cross-wires to the focal plane of this eyepiece to hold my eye’s focus when using it to search for planets in the daytime or in bright twilight.

DSLR Camera

This is my Canon 500D DSLR that I got as a birthday present early in 2011 and which I have started using for astrophotography. The camera is unmodded (IR filter not removed) as I use it for daytime photography too. I currently use the image-stabilised Canon kit lenses that I got with the camera which are 18-55mm and 55-250mm focal lengths. These lenses give surprisingly good results given their low cost.
The camera on its modified Manfrotto tripod can be readily mounted on my equatorial platform for tracked shots such as those seen here. Further information on the equatorial platform including a picture of the tripod on the platform can be seen here.
I can use an Astronomiks CLS (city light suppression) clip filter to reduce the effects of light pollution when using the DSLR. The clip filter sits in front of the flip mirror but with this in place the EFS lenses cannot be used as they foul the filter. I have the following lenses that can be used when the clip filter is in place;
- 50mm f1.4 Super Takumar manual lens, M42 mount with adaptor
- 28mm f2.5 Vivitar manual, M42 mount with adaptor
- 75-300mm Canon EF II zoom